How To Shower With A Central Line
*I am not sponsored by any of the brands of the products mentioned in this article.
When I first got on TPN, showering with my PICC line was incredibly difficult. I had scoured the internet for help but there wasn’t much on it. I had come up with a method using saran wrap but it was so time consuming, and I couldn’t take a normal shower.
I was excited for the Hickman since I knew I would finally be able to use the shower seals and after lots of trial and error I’ve used this same showering technique for over 8 months, and I have had no issues.
I wanted to share it below both in a step-by-step image guide and in a video format with captions so you can use whichever is most helpful for you.
KNOW YOUR SHOWERING NEEDS
Showering in itself is different for everyone and everyone may have different needs. Be sure to adjust your shower needs accordingly for how they might look for you.
I am able to stand up to get my hair wet but otherwise use a shower chair to sit down. My shower also happens to be ADA compliant, so it has grab bars and a detachable showerhead alongside a regular one. I’d really recommend both because they are really handy, and I’d recommend installing some if you don’t (you can find a lot on Amazon).
Since getting sick, my showering frequency has decreased a lot because of how fatigued it makes me. Alongside this, I have a lot of issues when disconnecting from my TPN (I have 24-hour infusions) so I can’t be in the shower for longer than 10 minutes. Lastly, showers are SO dangerous!! I absolutely hate taking them because every time I’m afraid of getting sepsis.
In order to limit my “in-shower-time” I try to only go in to wash my hair and body. If I need to shave, I try to do this outside of the shower so I can remain connected to my TPN and to prevent line infection risks.
PREPPING FOR THE SHOWER
I try to set up everything for the shower so the only thing I have to do is put on the shower seals and head in. Ultimately, this will depend on your body’s needs.
Be sure to get towels ready and anything else you may need for when you get in and out of the shower.
If you have long hair (hair past your ears), I recommend having a claw clip or clip of some kind nearby for when you step out of the shower which you will see the purpose of at the end.
PREPPING THE CENTRAL LINE
*in the images and video I am wearing clothing but it is assumed that for showering you would not be.
1. GRAB YOUR MATERIALS
You will need these items nearby:
- 3 Shower Wet Seals (the brand I use is called HydroSeal 7”x 7”)
- 1 Green Cap (for your lumen)
- 1 Blue Cap (for the TPN line if you plan on resuming feeds post-shower)
2. PREP YOUR CAPS
First thing I do is set the green cap nearby completely sealed; I will be opening it later.
Prep the blue cap by opening it up without touching the cap itself.
I personally do not use gloves because I learned specific ways to open the caps without touching the openings.

To open the cap, use the cap itself to push through the packaging and slide it out slightly so you are able to screw it in easier later.
3. PREP THE FIRST SHOWER SEAL

Take one shower seal and remove all of the seals off of it.
Set the shower seal down nearby with the sticky side facing up.
4. STOP THE PUMP AND CLAMP YOUR LINES

Next, go ahead and pause the pump (I personally have to then turn my pump off or else it will alarm).
Clamp both the TPN line and your lumen.
5. UNTWIST THE TPN LINE FROM YOUR LUMEN

You will then untwist/unscrew the TPN line from your TPN lumen however pay special attention to not touch the ends!! This could introduce bacteria into the line!
6. SCREW ON THE BLUE CAP

Transfer the lines into one hand while still making sure not to touch the ends!!

Next, grab the wrapper portion of the blue cap and place it onto the end of the TPN line.

After the cap is on and you’ve tightened it slightly, you can remove the wrapper and continue tightening the cap.
Once the blue cap is securely on the TPN line, go ahead and set that aside.
!!BE SURE YOU’RE STILL HOLDING ONTO YOUR TPN LUMEN!!
I typically put the head of the line into my TPN backpack just so it’s not sitting on the floor and potentially getting bacteria.
7. SCREW ON THE GREEN CAP

Begin by opening the green cap while being sure to not touch the opening of the cap.
In my image, you can see how I hold the back end of the cap to keep my fingers away from the part that will touch the lumen end.

After you have opened the cap, screw it onto the lumen.

I then grab a small piece of toilet paper and wipe around the base of the green cap to remove excess alcohol that seeped out from the cap.
*This is optional and I personally do it so if I happen to see my toilet paper that I use under my seal getting wet, I know it’s from water in the shower and not just alcohol from the cap (meaning I need to get out of the shower).
8. PREPARE YOUR TOILET PAPER BARRIER
I then grab a long piece of toilet paper (about 8 squares long) and begin folding it until it is one square in width.


This toilet paper will be on top of your central line to protect it in case any water happens to get in.
It acts as another liquid barrier and it’s a great signal to know if you have a leak somewhere in your seal or not.
9. COIL UP YOUR LINE

You will next need to coil up your line, so it is small enough to fit under your piece of toilet paper. My line is really long so I have to coil it around alongside having it in a griplock.
*It truly depends on your line and how long it may be to fit it under the toilet paper.
10. PLACE YOUR TOILET PAPER ON TOP OF THE COIL

You are going to place the toilet paper on top of your coil and hold the toilet paper in place with one hand.
Using your other hand, push in any straggling central line tubing and parts as best as you can so they are under the toilet paper.
11. PUT ON THE FIRST SHOWER SEAL
*Key Edges: Left Edge

Grab the shower seal that has the edge seals removed (the one we prepped at the beginning) and begin by attaching it to the top of your shoulder.
As you do this, be sure your other hand is still holding the toilet paper/coil area in place.

After the top of the shower edge is sealed to your shoulder, go ahead and move your “sealing” hand over the center of the square to hold in place the toilet paper while you slip your “trapped” hand out.
*You will now need to keep the new hand holding the toilet paper in place.

Use the free hand to begin sealing the left edge closest to the center of your chest. I usually start at the neck and seal down and outwards.
Try to have it as smooth as you can so there’s no bubbling or holes at the edges. This will prevent water from getting in.

After the top and left are secured, I then slide my hand along the bottom edge from left to right to seal it.
*My torso is quite small, so this usually makes some of the seal edge end up being under my armpit however, it helps keep it secure.
As you secure the bottom seal you can go ahead and seal the right side down.
12. PUT ON THE SECOND SEAL
*Key Edges: Neck + Left Edge
Grab the second seal (doesn’t matter which) and remove the edge seal stickers.
I then have the sticky side facing down and bend up 1/3rd of the seal to be facing me (which reveals a sticky side).

I slightly curve it as if it were a necklace and apply it to my neck overlapping slightly with the previous seal.

Next, I begin by sealing the left edge. The right edge does not matter as much because it’ll be on top of the first seal but the left edge here is really important.
*Try to get it as smooth as you can with no holes.

After securing the left edge, go ahead and seal the bottom and right edge since they are not as important and don’t have to be perfectly smooth.
Just double check that the neck and left edge are sealed when you are done.
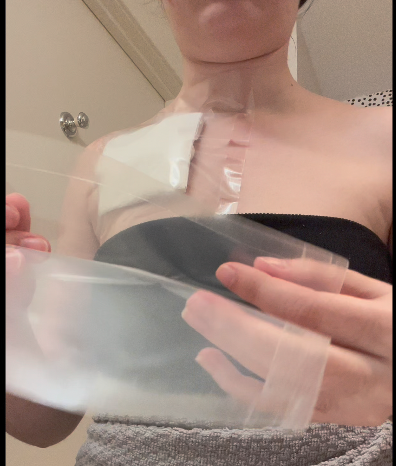
13. PLACING THE THIRD SEAL
*Key Edges: Neck + Shoulder Tip
Grab your last seal and remove the edge stickers.

You’re going to grab the seal and with the sticky side facing the floor, place it on top of your shoulder as if it were a shoulder pad or a towel you had hanging over your shoulder.
There should be some overlap with the first and second seal on the front side, but the seal should go over to your back a little.
I try to have the left edge at the base of my neck so it isn’t having to curve upwards potentially creating another hole for water to get into.
This acts as a slippery run-off for the water to not sit and seep into any cracks in the shower seals and will just fall off either end of the seal.
After you have placed the seal on and secured the front and back edge, if you have short shoulders like me, pinch the ends of the seal so they are not just left hanging unglued.
FINISHED!

Your seal may look something like this (since central line placement and body types will differ) and you can go into your shower!
It may take some practice to get the hang of it (and I’ve really broken out the steps) but this usually takes me about 3 minutes to do.
SOME THINGS I DO TO PREVENT WATER SEEPAGE IN THE SHOWER
I have some additional tricks I do to help prevent water from accidentally making its way into the shower seal (if it happens to but I have only every had it happen once).
- Keep an eye on the toilet paper.
I am constantly checking through the “window” of the seal (great thing that they’re clear) if I notice any of the toilet paper getting wet. If I do, I immediately step out of the shower to remove everything in order to not potentially introduce any more water into that area.
I personally have only ever had a small bit of water on the toilet paper happen the first time I showered using this method when I had just gotten my central line. After all this practice I haven’t but it still doesn’t mean it’s not something I’m constantly checking for!!
- Only use both arms when you’re facing the showerhead.
The only time I ever have both of my arms up is when I am adding shampoo or conditioner to my hair.
To do this, I turn so the front of my body is facing the shower head. I either stand or sit with my chest out of the water and apply the shampoo/conditioner.
*Water is more likely to get in if you have both arms up which moves the shower seal and potentially creates cracks for water to seep into.
- When your back is to the water, only use one arm.
I never lift the arm that has the side the shower seal is attached to. To rinse out my hair after shampooing I always just use one arm (my left in my case).
- When rinsing your hair, use your shower seal arm to hold down weak parts in the seal.
My shower seal arm is my right. When I am rinsing out shampoo from my hair with my left arm, I use my right to hold the furthest left edge seal down (shower seal #2) and the neck part from shower seal #2. This just helps keep it secure in case any water happens to run down that side.
GETTING OUT OF THE SHOWER
The first thing I do when I get out of the shower is wring out my hair using a towel to get excess water off.
I then grab my claw clip and put my hair up, so it is out of the way of my central line.
I then dry as much of my torso as I can with a towel and then I’m ready to remove the shower seal.
REMOVING THE SHOWER SEAL
1. REMOVE THE FURTHEST LEFT EDGE

I begin by removing the furthest edge. To help with any skin irritation or pain (since this does feel like ripping off a band-aid) I try to hold the skin down at any sensitive spots as I peel.
*I also recommend doing the same if any of the glue is stuck to any part of your dressing (so it doesn’t rip the dressing).
2. REMOVE THE LEFT EDGE OF THE 1st SEAL

Remove the left edge of the 1st seal we placed down when we were prepping for the shower. This seal can is the furthest underneath.
3. PEEL OFF THE BOTTOM EDGE

Peel off the bottom edge but make sure the toilet paper and lumens don’t fall out yet (you may need to use a hand to hold them up).
4. PEEL OFF THE REST OF THE NECK

Go ahead and move back to the top area and peel off the rest of the neck area under just the shoulder part remains.
5. PEEL OFF THE ARMPIT EDGE

*In order to not make this hurt- hold down the skin as you peel!!
Go ahead and peel the armpit/right edge by starting from the bottom and working your way up towards the shoulder.
6. PEEL OFF THE SHOULDER

While using one hand to hold in place the toilet paper and shower seal, peel off the last remaining shoulder shower seal.
If any dressing is stuck to the seal, hold down the dressing with your hand as you peel of the shower seal.
7. LET YOUR LUMENS DOWN
Double check that there’s no water on your torso and then go ahead and remove your hand from holding in place the toilet paper and coiled in place lumens.

Check that your toilet paper is dry to confirm that no water got in during the shower.
8. RECONNECT YOUR TPN
I begin by pre-loosening the blue cap (since it tends to get sticky from the TPN) and then unscrew my green cap.

Then reconnect the TPN line to the TPN lumen making sure that you do not touch the ends of the lines with your fingers (or anything else for that matter!).
Once they’re securely connected, you can resume your feeds.
*If you turned off your pump (like I have to do in order for it to not alarm), go ahead and turn it back on and hit “resume TPN”.
Don’t forget to unclamp your lines after your pump is running!!
VIDEOS
Pre-Shower Instruction Video
A video version of the pre-shower instructions above.
Post-Shower Instruction Video
A video version of the post-shower instructions above.
FINAL THOUGHTS
Showering just takes practice and eventually you will find a method that works best for you. Don’t give up and just keep trying out different methods until you find one you like.
As always, if you have any questions feel free to message me using the form below!